
This wine bottle lighthouse is one of those D.I.Y. wine bottle craft ideas I’ve always wanted to make for myself. It only took me about 2 hours of actual work and just a few materials that were not expensive. I’ll also show you a few tricks to make this project even more simple to make.
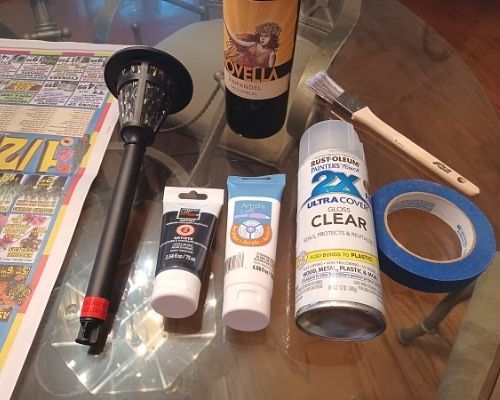
Items You Will Need
- Black acrylic paint (spray paint or brush-on)
- White acrylic paint (spray paint or brush-on)
- One solar stake pathway light
- Black sharpie pen or a black paint pen
- A pencil
- 1-inch wide (2.5 cm) painter’s tape
- Clear coat sealer
- Some newspaper
If you are using brush-on paints, you will also need:
- A paint brush
- A plastic tray
If you can find an empty black wine bottle then you can skip the part where you paint the black base coat on the bottle and go right to the taping off step. Not all wine bottles are created equally in size and shape so you’ll want to look for one that resembles a lighthouse shape.
When looking for a suitable solar pathway light, look for one that:
- Resembles the top of a lighthouse, and
- The bottom portion will fit into the top of the wine bottle you want to use.
The stake on the solar path light I bought was too wide to fit into the bottle but that’s okay because the top light was removable from the stake and had a “stake” of it’s own that I used to insert the light into the wine bottle.
Cleaning The Bottle And Remove Label
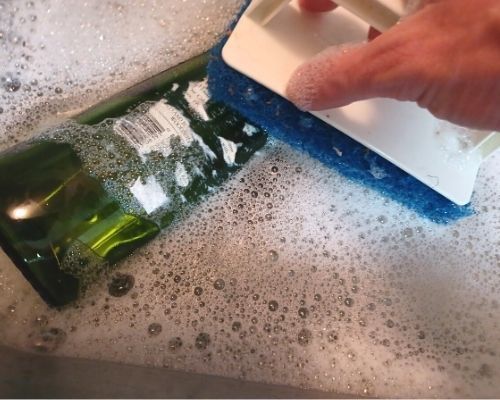
For the first step I soaked the bottle in hot dish soap for 15 minutes. This both cleans the bottle for painting and makes the label easy to remove.
I used my fingernail to scrape off the labels (you can use a butter knife) so I wouldn’t get tiny pieces of paper pulp in my scouring pad. When most or all of the label was removed I then used my scouring pad to remove any remaining adhesive left on the bottle. Soaking in hot dish soap makes it much easier.
Allow the bottle to dry completely before moving on to the next step.
Painting The Base Coat
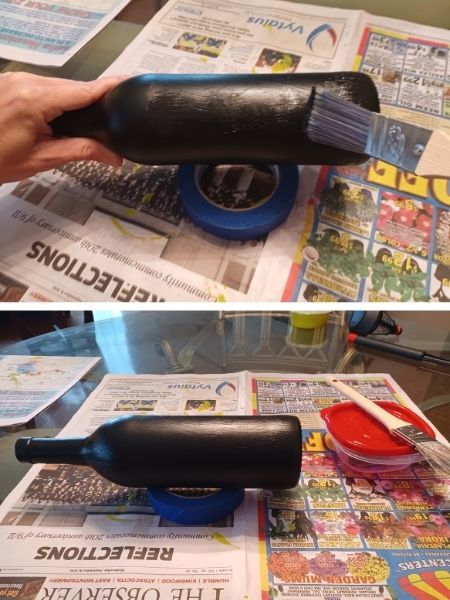
For the painting process I used brush-on acrylic paints instead of spray paint. This was because I thought it might be easier to detail with brush-on acrylics and I could paint it indoors where I could not if I used spray paint.
I did need to use brush-on paint if I wanted to paint it indoors but it turned out to not be true about the detailing. This was because the tape and a permanent pen will do all the detailing for you.
Painting on the black base coat is simple but you will need at least 2 applications. I allowed the paint to dry for 12 hours before applying a second coat of black.
Taping Off The Bottle
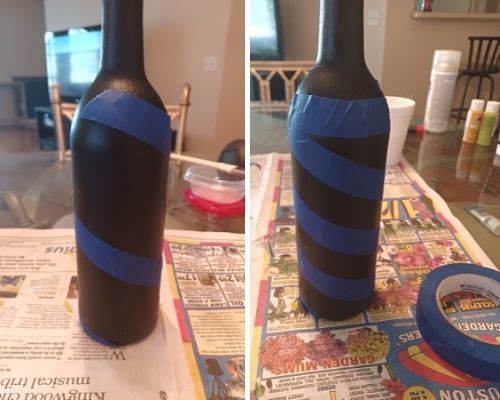
After allowing the second base coat to dry completely I started to tape off the bottle in preparation to paint the white stripes. You can see I stopped before reaching the bottleneck but of course you can run the white stripes all the way to the top of the bottle if you want to.
Using 1-inch wide blue painter’s tape, I started below the neck so I wouldn’t have to deal with the tapering top of the bottle. There is a little trick to getting the right looking stripe pattern. If I had used one piece of tape going all the way down then the stripes would have not been at the correct angle.
So instead, I skipped every other stripe going down the bottle (see photo above, left) so that the stripes would be at a more “correct” looking steeper angle like a lighthouse would appear. I then taped another one in between the first one. I just eyeballed it but you can measure if it helps.
Lightly apply the tape at first so that you can pull it up and move it easily if needed.
Painting The White Stripes
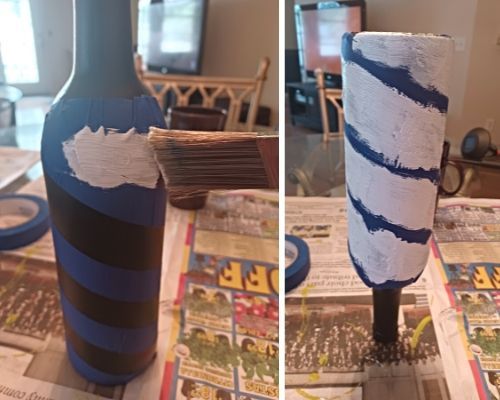
I then applied two coats of white allowing it to dry in between coats. Turning the bottle upside down made it easy to paint the bottom of the wine bottle.
Windows And Detailing
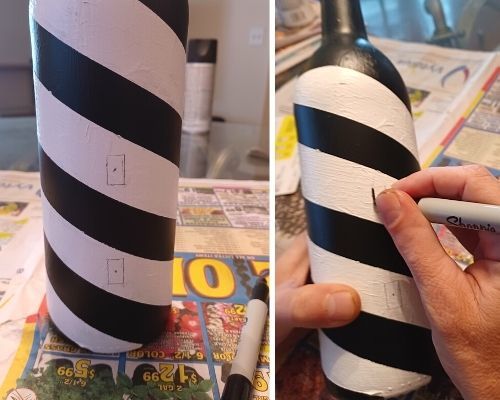
When the second coat of white paint dried it was time to remove the tape. I chose to draw in windows on both sides of the lighthouse using a sharpie/permanent marker (you can also use a paint pen).
Before I filled in the windows freehand I used a pencil to mark the center of the windows (see above photo, left). I then used a straight edge to outline the windows. This made it much easier to fill in the windows using a marker by freehand.
If you have any bleed over from the painting process or the tape did not create a perfect line then simply use the marker to cover up white areas where there should be black and for any black paint where there should be white, use white-out or a tiny bit of white paint applied with a Qtip.
I allowed the windows to dry for an hour so there would not be any possibility of the marker bleeding when I applied the protective clear coat in the next step.
Applying Clear Coat
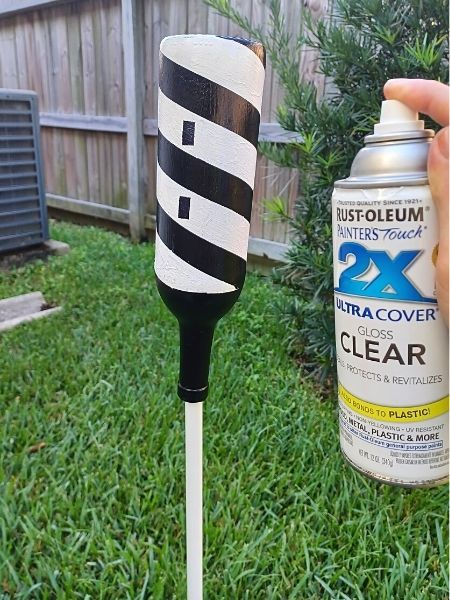
Even if you are not going to keep your wine bottle lighthouse outdoors I would highly recommend applying a few coats of a protective sealer. Be sure to do this step outdoors or in a well ventilated garage with the door open (run a fan if it is not windy).
I used a pole I found in the garage (see photo above), applying 3 coats, holding the can of sealant about 8-10 inches away from the bottle and using a sweeping motion. Do not overspray. You don’t want this coat to run, it will be noticeable if it does.
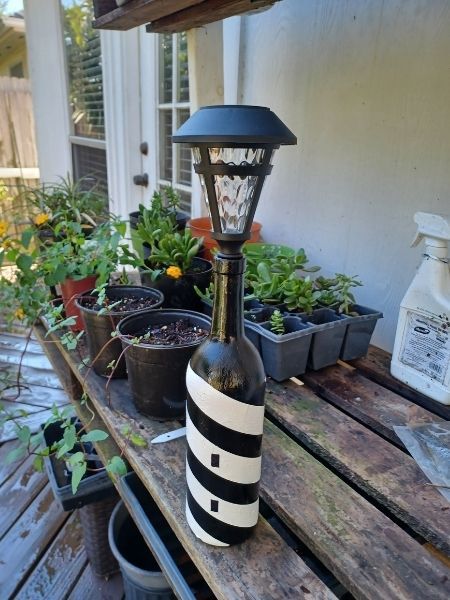
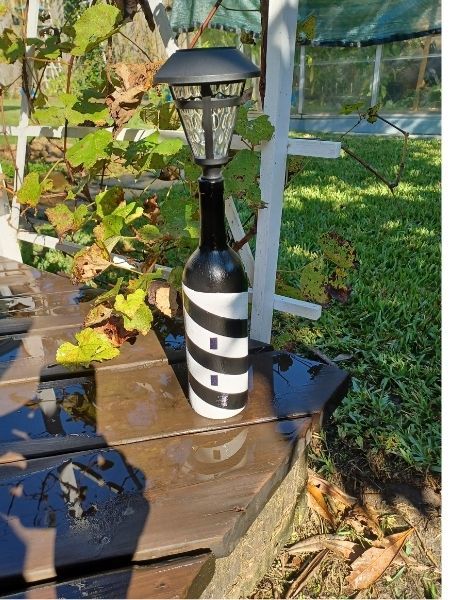
Here it is… the finished wine bottle lighthouse! As a last step I filled the bottom of the bottle with sand to give it some anchoring weight. I was worried the bottle was too top heavy and may break the solar light if it tipped over in the wind. You can use sand, gravel, marbles or whatever you can find around.
The whole project took around 2 hours of work and almost 3 days of drying time between coats of paint and seal coating.
I was very pleased with the result. I think I’ll make a couple more for my family, maybe mix it up and change the barber shop black stripes to red horizontal bands. You can search for lighthouse images online for all kinds of lighthouse painting patterns and inspiration.
I think you may also enjoy an article about many more decorative uses for wine bottles in the garden and patio including D.I.Y. windchimes, bottle walls for privacy, and more by clicking on the link below:
7 Ways To Use Old Wine Bottles In Your Landscape
You may also enjoy the following bottle craft ideas: